Even if you aren’t familiar with it, you probably recognize HTTPS — It’s that little string of letters you see at the beginning of most URLs these days. If you’re using an Internet browser like Chrome or Firefox, it’s probably accompanied by a padlock symbol or something similar.
It should look like this:

HTTPS stands for Hypertext Transfer Protocol Secure. It’s an extension of the Hypertext Transfer Protocol (HTTP), which is the foundation for all data communication on the Internet.
In this article, we’ll explore what HTTPS is, why it matters for SEO, and what you can do to enable it on your website.
Before we get into what HTTPS is and how you can enable it, let’s do a refresher on HTTP so you have some understanding of why it’s important.
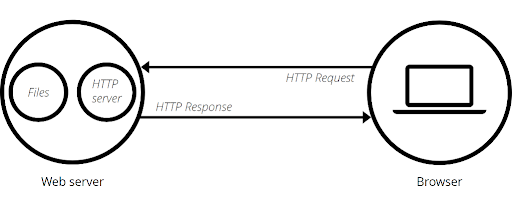
Put simply, HTTP is a system for sending and receiving information (data) across the Internet. Communicating across the Internet is always an exchange of information between a web client, such as an Internet browser, and a web server.
A web server is a combination of software and hardware dedicated to serving client requests online — you can think of it as a big computer that has files and software stored on it for the purpose of serving up websites to users.
When you arrived at this website, your Internet browser requested the web server that hosts the website to send data, which was then sent and rendered to you through your browser. All this requesting and responding occurs via the protocol for Internet communications: HTTP.
MDN Web Docs (Mozilla) uses a simple diagram to explain how this works:
Today, when your browser connects to a website, it can do so using either HTTP or HTTPS depending on what’s enabled on the website’s server. But, if you connect via HTTP and not HTTPS, you’ll probably get a notification that says your connection is “not secure.”
That’s’ because HTTP isn’t an encrypted protocol. Anyone monitoring your session can read your requests to the web server and its responses. If you’re sending sensitive information like a password or social security number through that connection, a bad actor could potentially pick it up and use it for malicious purposes.
This is why your browser might warn you when you’re using an insecure connection:

To make that connection secure, all data being sent to and from the web server needs to be encrypted. That’s where HTTPS comes in.
As we noted, the “S” in “HTTPS” stands for “secure” — it’s the secure version of HTTP. This protocol uses Transport Layer Security (TLS), a cryptographic protocol, to keep communications between your browser and a web client private. Most HTTPS protocols used to use the Secure Sockets Layer (SSL) cryptographic protocol, which was the predecessor of TLS.
When your website is secured with HTTPS, if anyone is monitoring communications between the web server and client, they’ll only see useless encrypted data. This makes HTTPS a safe protocol to use when sending sensitive information over the Internet.
As you can imagine, most website owners want to have HTTPS enabled so that their users know they are safe in using their website. Allowing users to send data over an insecure connection could be catastrophic for some companies and their customers. Can you imagine what would happen if it turned out that a bank’s customers were doing all their online banking through an insecure website?
But HTTPS is also important for any other type of website. Even if you don’t accept login information or other sensitive data from your users, you should still enable HTTPS. It’s the right thing to do for your users, and there are SEO benefits as well.
From a technical SEO perspective, we just need to turn to Google to understand the importance of HTTPS.
In 2014, Google announced that it would be giving a ranking boost to websites that use HTTPS. In their own words, this would be “a very lightweight signal” that would only give websites a relatively small benefit. They even said this signal carries “less weight than other signals such as high-quality content.”
But, more importantly, Google shortly thereafter proposed that web browsers mark websites that don’t use HTTPS as “not secure.” Since then, most browsers have taken up this proposal, which is why you get prompted when you enter a website that doesn’t use HTTPS.
This can have a devastating effect on your traffic and your click-through-rates. Nobody wants to use a website that has been marked “not secure,” regardless of whether they plan to transmit any sensitive data. Furthermore, some browsers will block users from entering an insecure website before they can even see the content, prompting them to hit the “back” button just to stay safe.
There are other SEO benefits to using HTTPS, too.
For one, you can get more data about where your traffic is coming from. Traffic sent from a secure HTTPS site to an insecure HTTP site has its referral data stripped away, according to Moz. That means all that traffic is listed as “direct” traffic, so you can’t tell where it was referred from.
HTTPS is also a huge trust factor for Internet users and other webmasters. People will be more likely to share and link to a secure website than an insecure one.
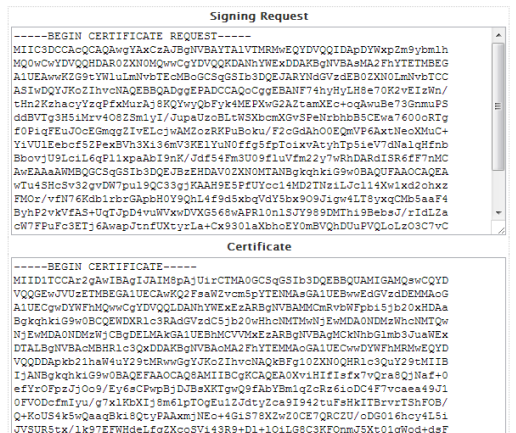
To enable HTTPS, you need a valid SSL certificate. This is a small data file that binds a cryptographic key to your website, or even a string of domains under your ownership.
You used to have to purchase SSL certificates separately. But if you built your site using certain website building applications, such as Squarespace or Shopify, it probably generated an SSL certificate for you. You should already have HTTPS enabled.
Similarly, if your website hosting is managed remotely by a major hosting provider like Bluehost, GoDaddy, HostGator, DreamHost, etc. you may already have an SSL certificate as part of your hosting package. That means HTTPS should already be enabled.
If it isn’t but should be, you should contact your hosting provider. If you still have HTTP and you don’t have an SSL certificate as part of your website package, you’ll have to buy one.
Getting an SSL Certificate is relatively easy. You may be able to buy one directly from your hosting provider if they haven’t issued you one already. For example, GoDaddy has a purchasing page dedicated solely to selling SSL certificates.
But you don’t have to go straight to your hosting provider, as their prices might be high. You can also buy a certificate from third-party sources known as Certificate Authorities (CA).
There are even some non-profit CAs that offer SSL certificates for free. Sites like Let’s Encrypt, SSL For Free, and Cloudflare all offer free SSL certificate options.
Manually configuring an SSL certificate takes several steps, and it requires you to install the certificate on the origin server where your website “lives.”
If you pay for managed hosting services, ask your hosting provider to configure your SSL certificate for you.
This is usually the best route if you don’t have the technical know-how to do this yourself or if you only have limited access to your server. What’s more, if you configure your certificate incorrectly, it could prevent users from finding your website.
If you decide to do this yourself, keep in mind that web hosting control panels and CA login dashboards vary. These are the basic steps you’ll need to follow:
If you’d like to verify your certificate, just click on the security icon in your browser (the padlock):
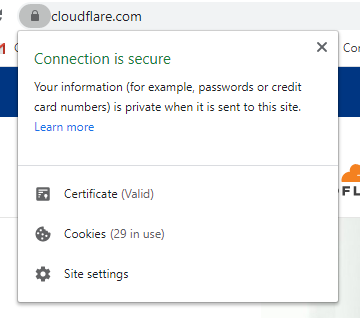
Then, click on “Certificate,” and you should see details about your SSL certificate, such as which CA it was issued by, who it was issued to, and for how long the certificate is valid.
That’s it. You’re secure!
Remember, configuring a certificate incorrectly could make your website insecure, which defeats the purpose of enabling HTTPS in the first place. If you don’t know how to do this yourself, rely on a developer or your hosting provider to do it for you.
Bliss Drive can help, too. Contact us now to talk about how you can keep your website secure and improve your search rankings at the same time!
Enjoyed this article? Read next: Mobile SEO: A DIY Guide to Optimize for Smartphones in 2021